Weapon Station
| Weapon Station |
|---|

|
Each weapon bay and harvester bay of a spacecraft are operated using a weapon station on the ship. The weapon station selects targets, adjusts weapon power (if applicable), and fires the bay weapon or harvester.
Controls are activated by clicking on the console using the hand cursor. Controls also have corresponding keyboard equivalents. Help about using the hand cursor and a table showing the key commands for this control station can be found on the Controls#Weapon_Station page.
Console

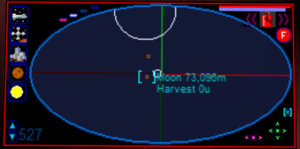
The primary display shows objects that have been detected within sensor range. The display depends on the sensors of the spacecraft. The sensors must be on and functioning for the weapon console to be usable. Refer to the Sensor Station page for more information about reading and using a sensor screen, including a key to the sensor blip images and their meanings.
The column of buttons at the left is used to declutter the display. Each button toggles the display of a class of objects. The classes of objects that can be displayed are Spacecraft, Space Stations, Vehicles, Cities, Planets, and Stars. Planets and stars will show on the display even when they are beyond sensor range; other objects must be within sensor range. The vehicles class includes boats, ground vehicles, and aircraft such as space fighters.
- Zoom scale is adjusted using three purple buttons at the bottom right of the panel. Purple arrows zoom in and out. The center button restores the default zoom level.
- View rotation is adjusted using five green buttons at the bottom right of the panel. Arrows change the rotation. The center button restores top-down view rotation.
The capacitor level and charge condition is shown at the upper right of the panel. A green bar indicates the capacitor is charging. A red bar indicates the capacitor is discharging. An amber bar indicates the capacitor is neither charging nor discharging.
- A bright blue bar beneath the capacitor level bar shows the capacitor power that will be consumed when the bay weapon is fired at its current power setting.
- If applicable, a triangular graph below the capacitor bar shows the weapon power level setting. Arrow keys can control this setting, along with the cursor.
- If operating a harvester bay, there'll be arrow buttons and an icon under the blue bar, used for changing which resource that bay is configured to harvest.
- A large red button below the power level setting is used to fire the weapon. Press the Fire button to trigger the firing sequence.
At the bottom left, you'll see two arrows, along with a number. This is used to cycle between different the bays available on the current spacecraft. This can switch between both harvester and weapon type bays.
The weapon/harvester fires at the target that is selected on the weapon panel. In the image above, a nearby moon is selected. It is 73 kilometers away. Of the harvester energy fired, the amount of energy that reaches the target drops off with distance. The image shows "0u" energy will reach the target, based on its current distance. This means it wouldn't harvest anything when fired. Similarly, this affects the damage and range if you were firing an energy weapon bay, or the size of the payload when firing any other type of weapon bay.
When fired, the bay weapon warms for about three seconds and then fires at the target. A hit on the target is not guaranteed. Factors such as relative speeds, target size and operator weapon skill affect the actual hit probability.